
by John O'Keefe-Odom
White on white, black on black, a full range of reflected tones plus an incident light source like a small flame; there are a lot of common situations that can turn into an exposure brainbuster. Two simple brush-up exercises can help get your skills back up to speed.
It takes some personal confidence to lead off with a photo of toilet paper.

I start with this because photographing a roll of toilet paper is an example one practice exercise for exposure adjustments that I like to recommend every now and then. Having difficulty getting your exposures right? Try some black-on-black metering or, some white-on-white metering.
At first glance, it looks like just another photo of a roll of toilet paper. But, here’s the exercise behind it: the paper is a white surface, textured with a weave to be non reflective. It’s sitting on a piece of white watercolor paper; somewhat reflective, but not glossy. The two are pretty close in their characteristics for reflecting light. They’ll both reflect a lot of light, and there’s not much surface difference in the two.
Now, try to show those two kinds of objects, in the same frame, without resorting to editing manipulations (where you would change one portion of the photo, but not the whole thing).
Just use exposure and lighting techniques to illustrate the form of the cylinder of paper (you can use paper towels or some other white objects, if the subject matter bothers you). Idea is, you want to cast shadows to show the form, but keep things subtle.
Meanwhile, the background paper also has a form, and it needs to show up in the photo. It’s possible to make some strong changes by placing a strobe real close to the subject; and then altering the tonal balance of the photo sharply; but, in this case, it’s a white-on-white exercise.
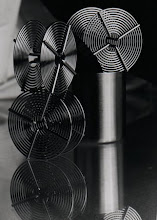
Next up is a simple variant of the white on white reflective exercise: full tones in a simple object. Goal here is to render tiny details with the way light falls, and still keep things within common exposure parameters. In this case, I chose a simple white candle in a black candle-holder on a gray card bottom/background. When I examine the small print, I can see details of the flame, the candlestick, a shadow that it casts. There are even textural differences on the glossy, slick curved surface of the candle itself. As you can see, all of these were metered and exposed to fall within common tones.

The candlestick exercise is the easier of the two to execute; sometimes it can require some brush-up with the strobe, but it’s not hard to do. This is a common setup I use for test stripping films and darkroom processes; in those cases, it’s not the camera work, but what comes after it, that’s usually being tested.
If you can meter these simple still life situations, you can meter just about anything. From these simple setups, you can take the exercises as far as your imagination will want to go. You can try to push the images darker or lighter; compress or expand contrast; any number of exposure or darkroom exercises can be carried out with these simple setups.
That white on white problem? A common issue not with toilet paper, but with wedding dresses. The candlestick exercise? Not usually used for candlesticks, but for more complicated outdoor shots that require a good range of tones; if the simple ones can’t be processed right, how would a landscape be?
Feel free to post your answers if you give it a try. Good luck. J.
It takes some personal confidence to lead off with a photo of toilet paper.

I start with this because photographing a roll of toilet paper is an example one practice exercise for exposure adjustments that I like to recommend every now and then. Having difficulty getting your exposures right? Try some black-on-black metering or, some white-on-white metering.
At first glance, it looks like just another photo of a roll of toilet paper. But, here’s the exercise behind it: the paper is a white surface, textured with a weave to be non reflective. It’s sitting on a piece of white watercolor paper; somewhat reflective, but not glossy. The two are pretty close in their characteristics for reflecting light. They’ll both reflect a lot of light, and there’s not much surface difference in the two.
Now, try to show those two kinds of objects, in the same frame, without resorting to editing manipulations (where you would change one portion of the photo, but not the whole thing).
Just use exposure and lighting techniques to illustrate the form of the cylinder of paper (you can use paper towels or some other white objects, if the subject matter bothers you). Idea is, you want to cast shadows to show the form, but keep things subtle.
Meanwhile, the background paper also has a form, and it needs to show up in the photo. It’s possible to make some strong changes by placing a strobe real close to the subject; and then altering the tonal balance of the photo sharply; but, in this case, it’s a white-on-white exercise.
Next up is a simple variant of the white on white reflective exercise: full tones in a simple object. Goal here is to render tiny details with the way light falls, and still keep things within common exposure parameters. In this case, I chose a simple white candle in a black candle-holder on a gray card bottom/background. When I examine the small print, I can see details of the flame, the candlestick, a shadow that it casts. There are even textural differences on the glossy, slick curved surface of the candle itself. As you can see, all of these were metered and exposed to fall within common tones.
The candlestick exercise is the easier of the two to execute; sometimes it can require some brush-up with the strobe, but it’s not hard to do. This is a common setup I use for test stripping films and darkroom processes; in those cases, it’s not the camera work, but what comes after it, that’s usually being tested.
If you can meter these simple still life situations, you can meter just about anything. From these simple setups, you can take the exercises as far as your imagination will want to go. You can try to push the images darker or lighter; compress or expand contrast; any number of exposure or darkroom exercises can be carried out with these simple setups.
That white on white problem? A common issue not with toilet paper, but with wedding dresses. The candlestick exercise? Not usually used for candlesticks, but for more complicated outdoor shots that require a good range of tones; if the simple ones can’t be processed right, how would a landscape be?
Feel free to post your answers if you give it a try. Good luck. J.


No comments:
Post a Comment