Wednesday, January 27, 2010

McLeod Showing "Point of Departure"

Chattanooga sculptor John McLeod will have an opening show at Covenant College on Lookout Mountain at 7:00 p.m. 10th February 2010.

The event is sure to be jam-packed with college coeds! Bring a friend.

# # #

UPDATE: What a success! The opening went really well. We're scheduled to go back next week and make some studio photos of the pieces in situ. We'll follow up with some photos of McLeod's latest works.

Tuesday, January 12, 2010

Photo: Firefighters After MVA 11 January 2010

Firefighters Meet After Ambulance Departs.
MVA, 11 January 2010, Chattanooga, Tennessee
Pentax K200D, 55mm Takumar, 1/20, f/4, ISO 1600. AP2.

# # #

Monday, January 11, 2010

Photo: Exposure for Sky Matched by Fill


Nandina Berries
Pentax K200D, 55mm Takumar.
VIV 285HV, umbrella, camera left.
1/125, f/4, ISO 100. AP2.

Exposure was measured for background sky at 1/500, f/8, ISO 100.
Dropped two stops on shutter to hit the camera's max synch speed.
Opened up two stops on aperture to accept flash fill.

Doubling of the normal two stop underexposure for fill occurred because of distance from flash to subject and also an allowance for bouncing from the umbrella.

Since the apparent area of the emitted area is larger from the umbrella than it would be for a point emission from strait flash, an allowance had to be made for the distribution of light. In this instance, it was two more stops. [cf. Inverse Square Law of Light]

Rule of thumb would be a stop lost for the bounce and a stop lost for the spread. With film, there would have been an additional approximate half-stop lost for the gold of the umbrella, a change in temperature relative to daylight silver film sensitivity. [That specific loss would have been determined by the formulation and response of the specific emulsion used.]

This allowed us to make up for the four stop difference in the light from the sky and the light from the backlit leaves. If it had not been made, the plant would have appeared much darker.

# # #

Sunday, January 10, 2010

Coaching Yourself: Exposure By Complexity

By John O'Keefe-Odom
AgXphoto.info

If you are coaching yourself through photography, and you are having trouble getting into manual exposure calculations, try this pattern below. It proceeds from least to most complex, for teaching yourself or coaching someone else.

  • Straight hot shoe flash exposure using guide numbers (100ASA, X-synch speed)
  • Sunny 16 daylight exposure
  • Incident light metering
  • Center weighted average metering through the viewfinder (ambient only)
  • Center weighted average with a simple overall tonal shift +/- 1 or 2 stops
  • Spot metering
  • Spot metering for tonal shift
  • Flash plus ambient ("shutter drag") based on spot metering
  • Flash plus ambient by flash & spot metering with a tonal shift
  • Flash plus ambient by guide numbers and center weighted average metering
  • Flash plus ambient by guide numbers and sunny 16 or other estimate
  • Any metering method with flash involving bounce, gel or light modifiers against spectral sensitivity of films
Give that course a try, and see if it helps you better.

# # #

Saturday, January 9, 2010

Photo: Pine Cone with Red Ribbon

Pine Cone with Red Ribbon
Pentax K200D, 55mm Takumar
Vivitar 285HV, CTO, snoot & boom.
Vivitar 285HV, PL, snoot.
Processed AP2.
# # #

Friday, January 8, 2010

Photo: 08 January 2010

Woodpecker.
Pentax K200D, 645 A* 300mm, 645 Adapter K.
1/1000, f/5.6, ISO 400. Processed AP2.

# # #

Thursday, January 7, 2010

Test a Real Piece of Junk For a Change

By John O'Keefe-Odom

Camera reviews don't tell us everything. They can be written by sitting down with a sales brochure, or they can be a summary of some pretty sophisticated testing. The main ingredient that's missing is our own experience. For beginners, the reviews can be a mystery of fantasies.

If you are a beginner out there, looking over reviews to buy your first "real" camera, or stepping up to a new DSLR, I recommend you write your own little review before buying that new camera.

Write a review of a real piece of junk.

I mean, garbage or near garbage. Review a camera yourself that's been fished out of the trash. Borrow one from that distant cousin who gave it to his toddler to chew on. Pull it out from between the cushions of the bench seat of a minivan with parched paint; wipe the snack crumbs off of the scratched plastic exterior, and use that camera for a week.

Corroded batteries? Replaced with whatever AAs you scavenged from something else.

Operating system? Windows 95 compatible, at best. Anything "barely usable" with your favorite computer is a plus.

If you are looking to buy a DSLR, fish out that really bad, but digital, point and shoot camera. It should look so bad that everyone else in the world believes it is useless, inoperable plastic junk.

Then use it, with vigor, for a week. Establish your sense of new lows. Recognize what's still good about the camera. Note those inconveniences you experience as you try to get the thing working.

Pay no more than $25 for this little experiment, all in. Borrowed equipment might work best.

Then, head on over to your favorite source of camera reviews. Often, there will be a summary of criteria used to judge the camera. Build one of those same lists for your piece of junk under testing.

Then re-read those camera reviews that interested you before you started your own testing. You might notice a few things:

The stuff you noticed about your junk camera might not be on the summary list in a way that fits into a neat category. Isn't it important for you to avoid those problems? This can help you identify sins of omission in reviews.

The good stuff about the camera might not be listed in the newer reviews. Why not? Superior technology? Or, was part of the good stuff not in the camera, but in the photographer?

If your junk camera did not fit your specifications for your preferred uses, why not? Was there a part that didn't comply with your needs? How so? This can help you identify which specifics are important to you in a camera.

Were there acronyms of specific tests which showed off one feature that's in your desired camera that are somehow not in other cameras? Why is that? Was the equipment special in its design, or is that acronym a marketing ploy?

Then, consider reviewing the camera you normally use, if you have another one. Run through this the same way. See how it stacks up. Do you really need a new camera?

If you want to make photos of wildlife, and all you have is a point and shoot, at least by now you should begin to specify what field of view you would like to have against what format size.

All in, this simple exercise can help you gain some experience with the equipment, and keep you from getting suckered as quickly by marketing schemes.

Monday, January 4, 2010

Photo: 04 January 2010

Vapor.
Pentax K200D, 55mm Takumar,
f/2.8, 1/6, ISO 1600; processed AP2.

# # #

Sunday, January 3, 2010

Photo: 03 January 2010

Cartop Kayak in January.
Pentax K200D, 55mm Takumar, 1/6, f/2.8, ISO 1600.
Processed AP2.
Photo made at night; light from a nearby street lamp.

# # #

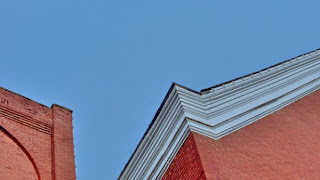
Unlocking White Balance Problems: The Three Layers of White Balance Adjustments In Editing

Church Roofline at Beginning Evening Nautical Twilight.
Counteracting Rayleigh Scattering with White Balance
and Attaining a Coloring Influence (Light Blue) From
Deliberate Discrepancy.

Original photo showed the sky as gray,
when it appeared to be blue, with a sunset behind the camera position.
Light temperature, approximately 4200K.
Recorded as D50, 5000K.
Processed as Tungsten, 3200K.
Pentax K200D, 1/90, ISO 400.
Lens and aperture unrecorded.

By John O'Keefe-Odom

Sometimes the concept of white balance is confusing for people who have just begun to gain experience editing in color. To make matters worse, sometimes our advice or directions sound convoluted or confusing.

The directions will sometimes be what sounds like a one step summary. "Set for 5000K," they'll say, or something like that. Meanwhile, that's a one-step answer to a three step problem.

White balance is a three layer problem. It's not one answer. In the final image, it's the result of at least three phases of editing, not including any deliberate additional tinting or filtration of light.

By the time we get to the final image, we have had at least three chances to edit what is regarded as white light.


White balance is a three layer puzzle.
For reflected photos (prints):
1. The color of the light striking the subject.
2. The definition of white by the recording media.
3. The definition of white in later processing.


This is why sometimes coaching our way to better white balance, or deliberately edited white balance, is sometimes confusing. Each subsequent stage can emphasize or neutralize the effect of the stage before it.

Further, discrepancies in emphasizing or neutralizing generate a new, observed color of white. If the effect of coloring or defining white cannot be adequately counteracted in later phases of processing with standard white balance temperatures, it is often because the preceding layer's temperature was not accurately observed by the editor. Hunt down the discrepancy by accepting that the light was recorded as the media observed it, which may not have been at a common temperature.

If the photo was made during daylight, then the apparent color temperature of the sunlight will serve as the basis for subsequent edits of an available light photo. This is because the influence of the sun will almost always overwhelm the influence of other light sources during daytime.

Sunrise, Sunset, Rayleigh Scattering and White Balance

The apparent temperature of daylight shifts during twilight. Daylight 5600K is the balance for many color films. At sunset, the apparent temperature is often very close to the white balance value for tungsten, 3200K.

At the onset of nautical twilight, the shift towards tungsten white balance values will accelerate. This is another description of the golden hour's yellowishness.

Why? Why does this appear to be so? The amount of heat the sun emits does not change. Yet, the light becomes more scattered by the atmosphere, in a way that is similar to a change in heat. This scattering of light that causes the goldenness of sunset is called Rayleigh scattering.

By making adjustments in photographic white balance, we can edit some aspects of the light to simulate or counteract Rayleigh scattering.

Rayleigh scattering means that the yellow to blue wavelengths of light will scatter more as the atmosphere is thicker. At sunrise or sunset, the red to yellow wavelengths of light keep on traveling, but the yellow to blue forms get scattered.

By making a white balance adjustment to emphasize or neutralize or simulate a sunset, we are addressing the loss or desired addition of those yellow to blue rays that would be lost in nature by Rayleigh scattering at sunrise or sunset.

To check the apparent shift in white balance values at sunset, record two test photos: one in daylight and one in tungsten. Make the tests an hour before sunset, half hour before sunset, and at sunset. The shift in white balance of the light will be observable, and easier to understand in terms of white balance, with those six photos on hand.

Projecting Images with Light and White Balance:

Digital photographers and presenters, note:

If the photo is a digital image, seen on the web or computer monitor, there is at least a fourth layer to the problem:

If the final image is seen with a source of incident light,
like a slide projector or a digital photo on a monitor:

4. The definition of white as transmitted by the
final viewing lamp (slide projector or viewer's computer monitor).

That fourth layer of the problem is an element often beyond the photographer's control in digital photography. It contributes to the appearance of the final image, as the telecommunicating viewer sees it. It influences his view of the photo, even though it is beyond the photographer's normal control.

A discrepancy between that fourth layer, and preceding layers, has an orange/blue coloring influence which can affect the photo in the same way as a discrepancy within the first three stages.

Remember the layers of the problem when editing white balance in photographs.

# # #

Saturday, January 2, 2010

Photos: 02 January 2010

Icy Red 401.
Ice on a wall fountain covers building numbers and reflects the red taillights of cars waiting at a nearby stoplight.
Pentax K200D, 55mm Takumar. 1/750, f/2, ISO 1600.

Yacht Approaches Walnut Street Bridge.
Pentax K200D, 55mm Takumar, 1/350, f/5.6, ISO 400, PL.

Musician in the Cold
A musician warms his hands as he takes a break from playing his guitar in 30F January weather. Chattanooga, Tennessee.
Pentax K200D, 55mm Takumar, 1/90, ISO 400. PL.

Friday, January 1, 2010

Photo: 01 January 2010

Statue outside of "Flowers by Gil and Kurt."
Pentax K200D, Takumar 50mm, 1/20, f/5.6, ISO 1600.
Post: AP2, centerlined adjustments.
Chattanooga, Tennessee
# # #