Sunday, December 27, 2009

Continuous Lighting for a Two Mile Radius


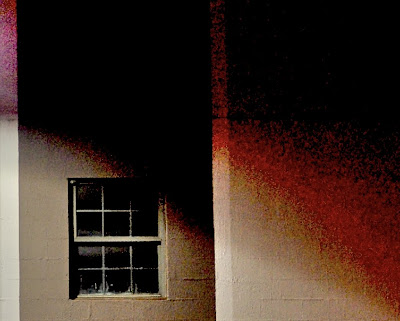
Movie Theater, Chattanooga.
Pentax K1000, 645 55mm; Pan F+ 32 ASA, D76 1+1; VCII printing on Ilford MG IV RC.

The street was dry as this photo was made; the bulb exposure of a high contrast area helps the street appear wet and slick, but it was actually dry and cold that night. The variance in brightness of the asphalt is actually the result of the angles of reflection; the family of angles between the camera, the lamp, and the surface of the street.


Autoviewer Slideshow. Click on the pictures to play the slideshow.

by John O'Keefe-Odom
AgXphoto.info

If we asked someone to spend untold millions to string up thousands of lights in a sprawling pattern so that we could illuminate a two mile radius every night, they'd think we're a bunch of crackpots.

We do it every night with street lamps.

Streetlights are one of our most common and overlooked sources of continuous lighting. Individually, we probably couldn't tote or afford to operate a single one of them by ourselves.

If you carried one of those lamps out there, maybe with a generator or a bunch of batteries; even if you had the electrical know-how to get the thing going, we wouldn't expect you to last long.

Street lamps operate almost all night long; sometimes with subtle differences based on day of the week, or time of night; but we use and ignore them all the time.

Every small town in America has unrolled the red carpet for you and your tripod. They installed street lights.

Some tips:
  • Get past the headlight thing. We all know those make trails. What other lights do you see?
  • Look for shadow patterns. Those lamps cast direct light, but that means they are also casting shadows. Use those shadows to your advantage.
  • Is it damp, drizzling rain, cold and miserable? Good! Wet concrete is more reflective; poor weather conditions can enhance some of the street lamp lighting effects. As long as you can operate the camera without it fogging up or freezing, you are good to go.
  • Compose the photo; exploit geometric lines and shapes. Manmade objects are one big gallery of Euclidian geometry. Approach photographing them from a slightly different angle, and those straight lines (like sidewalks and curbs) can become effective diagonals to lead the eye of the viewer.
  • Check exposure. A lot of these exposures for film speeds below 1600 will work out to be 30 seconds to a minute at f/8. At 32ASA, I find many fall in around one minute at f/8.
  • Digital imaging: exploit that white balance adjustment, and consider recording in daylight and processing in tungsten, or vice versa.
  • Consider selective flash use; maybe snooted flash directed at an important detail.
Nighttime is a great opportunity for one of the world's largest displays of continuous lighting.


Pentax K200D, 28-80 FAJ.
# # #

Sunday, December 6, 2009

Snowy Roses and Fall Leaves

by John O'Keefe-Odom


Click on the Autoviewer slideshow to play.


Photos made after some recent snows; leaves from this past fall. One of my favorites was the snow that had built up on the roses.

The blue tone to the photo came from setting the digital camera's white balance to tungsten; the images were later post-processed at the same temperature as daylight color film (5600K). This brought a touch of yellow back into the lighting scheme.

The ambient light was an intermittent yellow sunlight; the sun was emerging from behind the clouds after things warmed up after a night of snow. The yellowish color of the morning sunlight would negate some of the blue effect generated by recording the image as tungsten.

Eventually I settled on an exposure that had part of the area in shade (bluish) and part of the area in morning sun (closer to normal appearing white balance). As a sample, the photos below were all made at the same location, within a few moments of each other, with the same camera settings. You can see how the blue's influence varied with the presence or absence of the yellow morning sun.

The "Snowy Rose" photo that begins the slideshow was cut from the middle frame, below.
# # #

33¢ Neoprene Snoot For Hot Shoe Flash

The 33¢ Double O Dark Snoot, in action.

By John O'Keefe-Odom
AgXphoto.info

How much would you expect to pay for light shaping tools?

We found prices on snoots which ranged from $29.95 to over $150. Flash accessories sure can rake in the bucks; particularly, your bucks.

The amazing new "Double O Dark Snoot" is available for the cost of a 33¢ sheet of 2mm neoprene foam and a piece of duct tape.

Factor in transportation, tax, and time, you may have to spring a whole dollar for it, but it's still about $30 less than its nearest competitor.

The "Double O Dark Snoot" is an all-weather, flexible, crushable, reusable light shaping tool built to fit most hot shoe flashes.


It's a sheet of neoprene foam wrapped around the flash, snugly, and then secured with duct tape. It works great!

No loss of power, function or adjustability with the flash. No special brackets. Need to restore the original configuration? Simply remove the duct tape.

Need a custom size or shape for your beam of light? Utilize the on-site customizer kit, which consists of one more small piece of duct tape; and, simply tape down part of the front of the snoot to close off unwanted area.

This holiday season, before you give that $150 piece of plastic all of the budget, give a 2mm thick piece of neoprene and some duct tape a try.

Our field tests showed that the neoprene snoots were also CTO/CTB gel scrap compatible.

By using common materials and some common sense, you can improvise accessories for your flash which can operate safely, efficiently and effectively.

Unit may not be compatible with full frame snobs, what you tell your stock agency, canon vs. nikon debates, or celebrity photo equipment shop and tell sessions.

# # #