
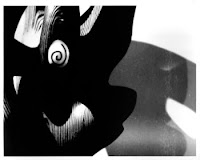
A cartoon of looking through The Furies, a sculpture by John McLeod.
by John O'Keefe-Odom

How hard can it possibly be? The drawing functions are built into a lot of digital illustration programs. The demos make it look like anyone can make a great drawing from a digital photo.
Given it a try lately? If you have, and you weren't super-great at drawing to begin with, maybe you figured out in the first fifteen minutes why you weren't doing this all the time. Here are some tips:
The basic premise is simple. The digital illustration programs (I used Corel Painter) often have some kind of function which will allow you to import a digital photo to a layer of the drawing. The idea is that you draw on top of this, and voila, a masterpiece!
To make it a little easier, this is what I picked up along the way.
1. Use a high contrast photo.
If you are into photography, it's probably no surprise that this was my lead suggestion. It comes up all the time in experimental processes for one simple set of reasons: black blacks and white whites. There will be a few grays inbetween, but they'll often be limited in number and surface area. You can find where the edge is easily, if you have a bright white surface bordering a dark black.
2. Check the image parameters before you begin.
In the digital drawing programs, you can often set the size of the drawing area. Also, in your computer, you can review what the dimensions of the photo are before you import it. Make some notes. Do the proportions match up? Do the sizes match up? Instead of getting in the application and stretching or reducing, sometimes using up computer power, check out the size limits on the photo and the drawing area before you begin. Set up the photo and the drawing area to go together. If you need to reduce the size of the photo, do that before you crank up the illustration program. Once you've got the photo's image file set the way you like, then import it.
3. Do not draw directly on the photo file.
Take advantage of those layers in the image programs. Import or place the photo in one layer, and do your drawing in another.

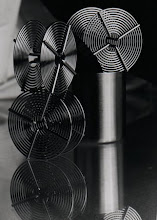
A drawing of John McLeod's Primitive Aggression
and the shadows it casts.
4. Use the layers to contain your mistakes.
I usually add two or three layers on top of the photo. I use one for digital paintbrush tests. When I change the drawing tools around, I flip up to the test layer and make some lines or spots. In drawing programs it can be easy to outrun the memory buffer of the "Undo" function. Just do your tests in another layer to avoid clogging up that buffer.
5. Pick a simple scheme and save variations.
In the cartoons I drew for this article, I didn't try to redraw La Giaconde, The Mona Lisa. I kept the line scheme simple, by following borders. When I was picking colors, I picked the ones I wanted according to a scheme that I thought would work. I also saved some of the variations along the way.
# # #


No comments:
Post a Comment