.jpg)
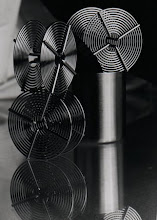
Yellow jacket in orange and blue;
gels on strobe to accentuate depth.
by John O'Keefe-Odom
AgXphoto.info
 Lighting diagram for the shot. One flash handheld on the left, above the subject and away from camera; pointed slightly back towards camera. CTO warm side closer to camera to throw the colder blue into the background.
Flash face covered with both CTO and CTB gels; each has half of the flash face. With the CTO towards the camera, and the CTB towards the background, this layout can bring a touch of aerial perspective from painting to the photo.
In aerial perspective, objects which are farther from the viewer are represented in blues; objects that are closer will be represented warmer.
Gels over the flash this way will still provide white light; because the light fans out; a fair amount of the surfaces close to the centerline of the strobe axis will be illuminated by both halves of the flash. Those areas will have a good amount of the traditional white light power of the flash, particularly at flash to subject distances that are within the first half of the thrown light's range at that power.

With the flash cast directly on the paper,
we can see the warmer parts close to us; and,
the colder light away.

With simple attention to the flash's axis of illumination, we can throw the colder light behind the subject. The warmer gels are used on the closer half. A close look at the penumbral edges (where the half-shadows meet light surfaces) will also show traces of the warm and cold gels.
Those penumbral edges are the primary disadvantage of this otherwise handy trick. If the flash is cast through cucoloris (any deliberate shadow pattern projected by a light before it gets to a subject), then all of those shadows will show that warm and cold fringe. The closer the cucoloris is to the strobe, the wider the penumbral fringe will be.
# # #


.jpg)
No comments:
Post a Comment