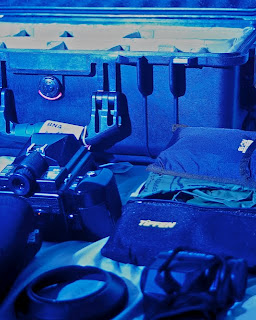
Hard case, as unpacked after flight.
by John O'Keefe-Odom
AgXphoto.info
I remember the look of my hand as I slammed closed the overhead compartment lid. I had just moved the third set of another passenger's luggage for them because they couldn't get their stuff packed into storage by themselves.
I was ticked. This was about the third time in a week that the flight had turned into a comedy of errors for a variety of reasons, all of them centered around passenger luggage.
We've gone from "zoo" to "circus" because of the carry-on baggage thing. Photographers can avoid this. Experienced travelers don't like being part of these problems.
Here's what I learned along the way.
As a photographer, bring the minimum to get the job done. My carry-on baggage fits under the seat. It's light; I check my main cargo. Check most of your photo gear. One laptop, one camera, one lens, all film and digital media are pretty much the only photo items I will carry.
Break down the larger equipment, like tripods, with a screwdriver so that you can get it into ordinary checked baggage.
Do not check film. Carry on film.
Do not check digital memory. Carry on digital memory and laptops.
Pack the main photo gear into a hard case. All of my hard cases have not only the usual scuffs, but some kind of "chew" marks on them from machinery. They take a beating.
Call the airlines after you get your ticket, and find out what the dimensions are for under-seat storage. The websites will have the maximum allowable dimensions for overhead storage.
You will notice other passengers bringing on elephantine luggage that looks like it was stuffed with balloon animals and bowling balls. They'll probably have other items lashed to the outside. Women's purses will be about the size of a Beverly Hills waterbed pillow. They'll contain microwave ovens, or other small kitchen appliances. Don't be one of those guys.
Bring the minimum. Check everything else. Let me say that again: check everything else. Yes, including those lenses; or, whatever else you have with you that you think is important.
If you have an involved trip, you'll need a few weeks, a reliable mail service, and a good receiver for the packages. Consider separate cargo lifts if you have a lot of stuff. The more time you are willing to spend on waiting for the gear, either in advance or after the trip, the cheaper the cargo mailing will be.
Allow for baggage costs in your travel plans. They're frequently removed from the immediate list price. That list price is just a sales pitch. Find out what your actual total would be.
Allow for airline insurance limits in your baggage. If you are not willing to destroy it, then leave it in the studio. My baggage inventories stay at or below 75% of whatever the maximum limit for compensation would be on that bag, for that type of flight.
International flight baggage insurance limits have a tendency to be low. By "low" I mean, below $750; around $500 would be common.
Keep that in mind if you carry a CanNikon 547 X-Mark D 9000 with Hubble Telescope Super Zoom f/1.1 lens.
I avoided an additional $250 in charges on a recent trip by taking a measuring tape to my favorite hard case. It was three inches over size; and, yes, it was heavy. That case has served me well, but it was not the right answer for this last trip. There's no end-all, be-all solution.
Give yourself a shakedown inspection, twice. Do you really need it? If the answer is "maybe", then remove it. Yes, remove it.
I was able to move several hundred dollars in film through carry-on X-ray machines in the United States with no trouble. I chose slower speed films for the trip just for this reason.
100ASA and below will keep you within the X-ray limits by a generous margin. The published limit is 800 ASA. Over that, and the machine is sure to fog the film. Check your TSA website for the requirements before you fly.
Check the specific website of your airlines for baggage and carry-on guidance before you fly. There are so many variations in the rules from airline to airline, and even from aircraft to aircraft (because of spacial structure), that there is no one set of comprehensive rules.
Get the facts about your specific flight, each one, that specific plane, from your airlines.
As an example, here's a list of what I brought on a recent trip, by bag. The trip's project involved using three different formats, digital images, two slide films, and my mainstay, black and white film in 135 and 120mm. Outdoor environments were: desert, grassland, forest, beach and underwater.
Pelican 1514, packed for flight,
excepting items used to make the picture.
Packed into Pelican Case:
- Vivitar 285 HV with batteries, 6’ coiled PC cord, hot shoe to PC adapter
- Changing bag wrapped around Manfrotto Ball/Pan head
- Pentax 645 80-160mm zoom
- Pentax 28-80mm FAJ with Zing soft case
- 77mm lens hood
- Minolta Spotmeter F
- Battery recharger with cord
- DSLR cord
- 12” PC cord to “thorn”
- 49mm reversal ring
- 49mm closeup filter kit
- 50mm Takumar with K mount adapter
- Pentax K200D with hot shoe to PC cord adapter and neoprene strap
- Pentax 645 body
- Tenba Rain Cover
- Wet Weather nylon bag
- 77mm filter kit
- Scissors, tape, compass

Hard case loading, minus the DSLR that I made the picture with,
its lens, and a tripod head.
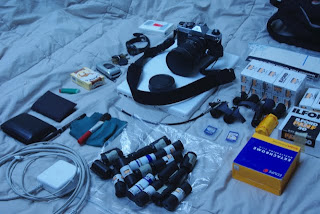
Carry-on contents. Items were well below the size restrictions for
domestic air travel in the USA.
In carry-on:
- Pentax K1000
- Pentax 645 Adapter K
- Pentax 645 35mm lens
- Cable release
- Cleaning cloth and brush
- 120mm films (Ektachrome E100G, Pan F+)
- 135mm films
- bulk reel films (EDUPE and Ilford Pan F+)
- All films at or below 100ASA
- Laptop computer with cords.
- Paperwork and personal items I would normally carry in my pockets.
Additional items for photography in different environments
get packed into the suitcase.
In suitcase:
- Manfrotto tripod, with legs detached by screwdriver
- Screwdriver
- Boots
- EWA Marine UF underwater bag housing
- Mask, snorkel, fins, 1mm wetsuit
- Katadyn Pocket Filter water filter
- Spare 35mm cassettes (empty).
- Clothing and personal items.
Break down that tripod with a screwdriver
so that you can pack it in a small suitcase.
Pack the screwdriver in checked baggage.
And, if you need me to pack your luggage in an overhead bin because you can't lift it, then remember: I drink Jack Daniel's. Thanks.
Bon Voyage.
J.
# # #
.jpg)
 Lighting diagram for the shot. One flash handheld on the left, above the subject and away from camera; pointed slightly back towards camera. CTO warm side closer to camera to throw the colder blue into the background.


.jpg)


.jpg)




 Posts
Posts


.jpg)

