Sunday, December 27, 2009

Continuous Lighting for a Two Mile Radius


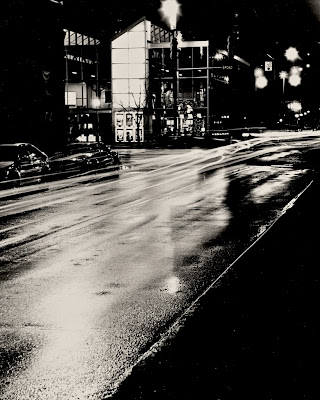
Movie Theater, Chattanooga.
Pentax K1000, 645 55mm; Pan F+ 32 ASA, D76 1+1; VCII printing on Ilford MG IV RC.

The street was dry as this photo was made; the bulb exposure of a high contrast area helps the street appear wet and slick, but it was actually dry and cold that night. The variance in brightness of the asphalt is actually the result of the angles of reflection; the family of angles between the camera, the lamp, and the surface of the street.


Autoviewer Slideshow. Click on the pictures to play the slideshow.

by John O'Keefe-Odom
AgXphoto.info

If we asked someone to spend untold millions to string up thousands of lights in a sprawling pattern so that we could illuminate a two mile radius every night, they'd think we're a bunch of crackpots.

We do it every night with street lamps.

Streetlights are one of our most common and overlooked sources of continuous lighting. Individually, we probably couldn't tote or afford to operate a single one of them by ourselves.

If you carried one of those lamps out there, maybe with a generator or a bunch of batteries; even if you had the electrical know-how to get the thing going, we wouldn't expect you to last long.

Street lamps operate almost all night long; sometimes with subtle differences based on day of the week, or time of night; but we use and ignore them all the time.

Every small town in America has unrolled the red carpet for you and your tripod. They installed street lights.

Some tips:
  • Get past the headlight thing. We all know those make trails. What other lights do you see?
  • Look for shadow patterns. Those lamps cast direct light, but that means they are also casting shadows. Use those shadows to your advantage.
  • Is it damp, drizzling rain, cold and miserable? Good! Wet concrete is more reflective; poor weather conditions can enhance some of the street lamp lighting effects. As long as you can operate the camera without it fogging up or freezing, you are good to go.
  • Compose the photo; exploit geometric lines and shapes. Manmade objects are one big gallery of Euclidian geometry. Approach photographing them from a slightly different angle, and those straight lines (like sidewalks and curbs) can become effective diagonals to lead the eye of the viewer.
  • Check exposure. A lot of these exposures for film speeds below 1600 will work out to be 30 seconds to a minute at f/8. At 32ASA, I find many fall in around one minute at f/8.
  • Digital imaging: exploit that white balance adjustment, and consider recording in daylight and processing in tungsten, or vice versa.
  • Consider selective flash use; maybe snooted flash directed at an important detail.
Nighttime is a great opportunity for one of the world's largest displays of continuous lighting.


Pentax K200D, 28-80 FAJ.
# # #

Sunday, December 6, 2009

Snowy Roses and Fall Leaves

by John O'Keefe-Odom


Click on the Autoviewer slideshow to play.


Photos made after some recent snows; leaves from this past fall. One of my favorites was the snow that had built up on the roses.

The blue tone to the photo came from setting the digital camera's white balance to tungsten; the images were later post-processed at the same temperature as daylight color film (5600K). This brought a touch of yellow back into the lighting scheme.

The ambient light was an intermittent yellow sunlight; the sun was emerging from behind the clouds after things warmed up after a night of snow. The yellowish color of the morning sunlight would negate some of the blue effect generated by recording the image as tungsten.

Eventually I settled on an exposure that had part of the area in shade (bluish) and part of the area in morning sun (closer to normal appearing white balance). As a sample, the photos below were all made at the same location, within a few moments of each other, with the same camera settings. You can see how the blue's influence varied with the presence or absence of the yellow morning sun.

The "Snowy Rose" photo that begins the slideshow was cut from the middle frame, below.
# # #

33¢ Neoprene Snoot For Hot Shoe Flash

The 33¢ Double O Dark Snoot, in action.

By John O'Keefe-Odom
AgXphoto.info

How much would you expect to pay for light shaping tools?

We found prices on snoots which ranged from $29.95 to over $150. Flash accessories sure can rake in the bucks; particularly, your bucks.

The amazing new "Double O Dark Snoot" is available for the cost of a 33¢ sheet of 2mm neoprene foam and a piece of duct tape.

Factor in transportation, tax, and time, you may have to spring a whole dollar for it, but it's still about $30 less than its nearest competitor.

The "Double O Dark Snoot" is an all-weather, flexible, crushable, reusable light shaping tool built to fit most hot shoe flashes.


It's a sheet of neoprene foam wrapped around the flash, snugly, and then secured with duct tape. It works great!

No loss of power, function or adjustability with the flash. No special brackets. Need to restore the original configuration? Simply remove the duct tape.

Need a custom size or shape for your beam of light? Utilize the on-site customizer kit, which consists of one more small piece of duct tape; and, simply tape down part of the front of the snoot to close off unwanted area.

This holiday season, before you give that $150 piece of plastic all of the budget, give a 2mm thick piece of neoprene and some duct tape a try.

Our field tests showed that the neoprene snoots were also CTO/CTB gel scrap compatible.

By using common materials and some common sense, you can improvise accessories for your flash which can operate safely, efficiently and effectively.

Unit may not be compatible with full frame snobs, what you tell your stock agency, canon vs. nikon debates, or celebrity photo equipment shop and tell sessions.

# # #

Tuesday, November 17, 2009

Is It A Photo?


Is it a photo? What do you think?
# # #

Sunday, November 1, 2009

Stephen Colbert Helps the Economy!

by John O'Keefe-Odom
AgXphoto.info

Yes, he's done it. Stephen Colbert, of Comedy Central fame, has probably just done more to help the economy than most politicians. He's actually had the guts to recommend someone for a job!


The Colbert ReportMon - Thurs 11:30pm / 10:30c
Job Recommendation From Stephen Colbert
www.colbertnation.com
Colbert Report Full EpisodesPolitical HumorReligion
Embeded video courtesy of www.colbertnation.com

Colbert's spot on his website is one step up from the weblink marathons that so many job applicants encounter. Tired of being referred to a web page by a web page when you need real help?

Well, then send Colbert's reference on to the web application that requested you fill out their stinkin' forms 96 times without even getting a rejection email!

A big fan of the show, I can't help but endorse The Colbert Report's humorous move. It shows, through comedy, what a lot of us really need: a chance to cut through the bull and get on down to brass tacks with a face to face interview or maybe even, gasp, a face to face rejection, during the job search process.

I don't know about you, but if I had ever received a candid, face to face rejection, that business would be a step up in my book.

So, next time you receive a crass dismissal through ignoring, remember your reference from the Colbert Report. And, maybe consider it in that next month's round of re-completing employment applications.

# # #
Reference website:

Monday, September 28, 2009

Order Up Your Official Rejection Today!

Trailer for "Official Rejection" from the
You Tube Channel for Tentilnoon.

by John O'Keefe-Odom
AgXphoto.info

If you've ever submitted anything, you've probably been rejected. If you thought making a movie was a circus, wait until you see what these people have got to go through to get someone to watch it!


This documentary is about people breaking into independent films; what they expect versus the reality they'll encounter. Probably quite a bit of truth in the humor to it.

I've seen the trailer and met some of the people who worked on the film, and I know it's going to be good.

I saw my first shred of evidence that this movie existed when I met Joe Kraemer, a composer who works in and around Los Angeles. He was wearing a black baseball cap, done in quality fabrics, emblazoned with a large gold wreath around the words "Official Rejection."

Ya gotta have confidence to walk around with one of those on your head. Sure enough, he had confidence and a good sense of humor, and he was apparently damn good at what he does with music.

Around that time, I was lounging in sunny California, having finished up a trip along the Pacific Coast Highway to make some landscape pics for a follow up to a project that I've been working on here in Tennessee.

I had driven several hundred miles over the week, and had pretty much learned that a lot of California bears a strong resemblance to some parts of Iraq. Considering some of the items on my itinerary for that Iraq trip, I wasn't exactly overjoyed to be looking at that type of terrain again, but I came back with some good pictures.

Molera Point, Central California Coast

Thanks to some connections and local contacts, I ended up at the Skirball Center for a cancer benefit with the Elixir Fund. I had a chance to meet some nice people, many of whom were in showbusiness of one sort or another. All of them were smart; all of them seemed to be hardworking and dedicated. These were a bunch of people that I thought should be doing well, and I hope they do even better.

So, I'm hob-nobbing with Hollywood in the bosom of this fantastic architecture when Joe Kraemer fired up his band, Gum, preferred by four out of five dentists, for the evening's entertainment.

He had some good ideas for music; he worked on Official Rejection; I'm sure that's going to be good.

While I was at the cancer benefit, I met this attractive brunette, dynamic and smart, who had an interest in rock climbing. Having just come back from Pinnacles, I was trying to come up with whatever I could say that would get the job done. Meanwhile, she mentioned that she was working in production for a reality TV show; and, I managed to blow it by talking about how I don't like reality TV.

Rock face with trees, Pinnacles, National Monument, California

I got Officially Rejected, right there, once again. She was nice about it, but next time I think I might get more milage out of talking less. Maybe I'll just take my shoe off and start snacking on it right there like it's a hamburger, so that I can eat least get some comic value out of putting my foot in my mouth.

Some time later, I got to hear what Joe Kraemer had to say about life in general over there in Hollywood. I came to the conclusion that he knew what he was talking about when it came to music and movies.

Since he worked on Official Rejection, I recommend you check it out.

# # #
Reference websites:

Sunday, September 20, 2009

Habitat for Insanity with The Rayons


The Rayons at J.J.'s Bohemia during Habitat for Insanity, a fundraiser for Habitat for Humanity in Chattanooga.

By John O'Keefe-Odom
AgXphoto.info

Contact sheet review from the night before showed that the typical hot-shoe flash lighting plan wasn't going to provide the illumination we needed to fill out the photos. A lot of times, the trend in bar band photography will lead us to push for higher sensitivity (1600 ASA, plus), slower shutters, and faster apertures.

After reviewing a contact sheet of Ilford Delta 3200 developed at 6400 ASA in D-76 stock, I knew it was time to add another point of light. The subjects and venue were accommodating. To improve the lighting plan, I added an old strobe with a CTB gel on an optical relay, and put it on a lightstand about nine feet high (3 meters).

Even though there were many other cameras using flash in the audience, I had no noticeable problems with other people tripping the flash.

Preparations for installing the lightstand included a review of the exposure math. Careful attention to the optical relay's orientation was something I experimented with. I simplified the setup after a few trials, and chose a strait hard flash with gel and optical, pointed directly at the subject's area, from above.

All of those tests were done in a garage, before the event. Since I ran the tests, I was able to cut my kit bag of carried items down to only what I chose to use. I was able to install the lighting quickly and with confidence.

That night, I carried a Pentax K200D, a 645 55mm all manual lens with K mount adapter; my Vivitar 285HV gelled and corded up; a ligthstand with old strobe and optical relay, and my Pentax K1000 loaded with Ektachrome.

That's right: two cameras and one lens. I swapped and shared between them.

The night before, at another one of The Rayon's sets, I shot the test AgX with Pentax 645 and handheld single point flash.

During the trials after the first night's set shots, I had reviewed and discarded options for warmer gels in the background; split gels on my handheld Vivitar 285HV (I went with plain CTO instead); and the use of umbrellas and bounce. In the day before's setup, my highest failure rate had been in photos related to the use of bounce. In tighter interiors, usually backwards bounce does me well. This time, it was time to throw some hard light.

The blue rim light on Courtney's hair is from the CTB on lightstand, which happens to backlight her from this angle. The golden tones on the skin of the subjects are from light cast forward with a handheld Vivitar 285HV with 6' (2 meter) coiled PC cord between hot shoe to PC cord adapters. The gel on there was a full CTO (color temperature orange).

The pattern of closed eyes in the facial expressions of the singer and the audience made "closed eyes", something a lot of us want to avoid in photos, into a compositional technique to help tell the story. Here, we see the audience connecting with the singer.

High CTB backlighting for rim and general illumination; warm CTO thrown forward. A careful inspection of the drummer's face, on the left frame's edge, shows the interplay of the thrown blue and orange gels.

Drummer and bassist of The Rayons.

She's so shy. Courtney, lead singer for The Rayons, reaches deep inside, piercing her quiet, withdrawn exterior to get in touch with her feelings for a change.

# # #

Get a Background: Get Your Subjects On Location


Actor Anthony Robinson, on location at Greeter Falls.

By John O'Keefe-Odom
AgXphoto.info

We didn't fake it. He's not standing in a studio; that's not a still photo or computerized background behind him. Actor Anthony Robinson was knee deep in water when that photo was made.

The tripod was in the water. The lightstands were in the water. The photographer was in the water. The subject was in the water. That's where we had to stand to get that photo made.

You don't need digital wallpapers or custom-painted backdrops to make good portraits. Sometimes, you just need an old-fashioned travel plan.


Notes, notes, notes: field and labwork notes make later reproductions successful. The strip of contact sheet is actually a form of record keeping, because we know under what conditions it was made. It's now a set of visual notes.


All of these photos were achieved by bringing the subject to the location. The backgrounds aren't from fancy photo editing tricks, or computer hocus-pocus. We brought the subject to the location, and made the photo.

100% real, all-natural background. Get out there, and get it.


Get a plan before that trip begins. This successful outing was based on repeated trips to the location. I built several pages of diagrams like this one, outlining my ideas, before departure. Scout out those locations. This was another instance when repetitive visits paid off.

"I want to put you in this photo," I said. I knew where I wanted to place my subject for the photo session. Having some prints on hand and diagrams for explaining the plan helped to boost confidence. They help the subject to visualize success.


Pre-trip inventories were important. It was over 100 miles by road to the photo shoot's primary locations. No two days of photographing end up being the same. Make a bedsheet layout of the bag contents a standard practice before you leave, and you'll be more successful.


Key doodads. These small items made the lighting kit happen. If any of them had been left behind, the planned session would not have worked as desired.


35mm backup roll shot on location. While most web users want or need digital images, I prefer to shoot at least some film because I know that's how my most successful images have been made. Safe-side the plan, and don't risk everything. It's a hundred miles back out there, if you fail.

# # #

Sunday, September 13, 2009

One Lens & Adjust for Tungsten: The Dylan Kussman Band at The Riverhouse

Vivid colors captured indoors with a simple white balance adjustment.

by John O'Keefe-Odom
AgXphoto.info

Subjects can really twist your arm sometimes. This last bunch, a rock band, forced me to overcome obstacles and challenge my wits by making me face one of the greatest photographic difficulties of all time: photographing the band, while they were inside a bar packed with cold beer and good looking women.

I had to take several breaks.

Dutifully, I managed to get some pictures. Of the band.

I travelled light with two lenses; I believe I ended up using a 645 55mm at f/2.8 most of the time. It would come in around 70mm on the DSLR, with a horizontal angle of view similar to a 100mm.

The second lens got out of the bag long enough for an angle of view check. It went right back in the bag. I only needed one lens.

A quick exposure check showed that 400 ISO wasn't going to cut it, unless I was willing to break out the flash. I was planning on firing up the scene with Ye Olde Vivitar 285, but the stage was lit pretty well by the house lights. I scrapped my plan, and moved to catch what was there.

Pumped up to ISO 1600, I was skeptical. Yet, as soon as I slapped on the Tungsten white balance adjustment, I knew I was in. Vivid colors filled the files. I knew I would pick up a lot of motion blur, with common shutter speeds at 1/6; but since my subjects were in motion, well, why not?

As with many motion blur photographs, motion within a portion of the frame is often acceptable, if it's part of the story. Motion in the subject works. Motion from camera shake doesn't. Use your judgement.

While it's tempting to focus on the lead singer of that rock'n'roll band, there's a whole band! Photograph the other musicians! This band had plenty of interaction; they played their music together. That's part of the story. If it was all about the frontman, by himself, he'd be a soloist. The show is put on by a band. They're a group of people. Photograph the whole group, sections of the group, individuals, people and objects; what is that band doing? The whole band.

Since they're all playing, they all count. If I had directed my attention only to the lead singer, I would have come back with about 25% of what I photographed that night. Get photographs of the whole band.

If subject motion blur is part of the story, let it roll. Why fight it? These streaks were caused by movement faster than 1/6 of a second. If the subject is moving that fast, why not show that motion? Let them draw with the light sometimes.

Here's a classic problem with people and instruments or tools: how are we going to capture them, and get it all in? My answer: don't get it all in. Focus on a subject for the frame of the photo. It's really not that different from how we might photograph people in other instances. For example, when was the last time we insisted on photographing someone from below their shoes to above their head, all the time? Full length portraits happen, but we're often willing to make photos at 3/4 or tighter, if that tells our story.

In the case of musical instruments or other large objects people hold and use, why feel pressed to show the whole thing? Cut the frame of the photo so that it has a clear subject. If you're getting it all in to have a nice, overall view; then it had better be a great enough view to displace the concept of a subject in a photograph.

Get a subject. It helps.

Don't stop the rock. If you grab a lot of motion while catching motion, go ahead and use it. This bass guitarist sprang into a bold pose for about half a second, and then hopped back into a traditional stance for most of the rest of the show. It was a one-time capture of stage attitude. Catch it if you can. The motion blur is part of the story.

Friday, September 11, 2009

Split Gels: Packing Aerial Perspective Into Single Point Flash


Yellow jacket in orange and blue;
gels on strobe to accentuate depth.

by John O'Keefe-Odom
AgXphoto.info

Lighting diagram for the shot. One flash handheld on the left, above the subject and away from camera; pointed slightly back towards camera. CTO warm side closer to camera to throw the colder blue into the background.

Flash face covered with both CTO and CTB gels; each has half of the flash face. With the CTO towards the camera, and the CTB towards the background, this layout can bring a touch of aerial perspective from painting to the photo.

In aerial perspective, objects which are farther from the viewer are represented in blues; objects that are closer will be represented warmer.

Gels over the flash this way will still provide white light; because the light fans out; a fair amount of the surfaces close to the centerline of the strobe axis will be illuminated by both halves of the flash. Those areas will have a good amount of the traditional white light power of the flash, particularly at flash to subject distances that are within the first half of the thrown light's range at that power.


With the flash cast directly on the paper,
we can see the warmer parts close to us; and,
the colder light away.


With simple attention to the flash's axis of illumination, we can throw the colder light behind the subject. The warmer gels are used on the closer half. A close look at the penumbral edges (where the half-shadows meet light surfaces) will also show traces of the warm and cold gels.

Those penumbral edges are the primary disadvantage of this otherwise handy trick. If the flash is cast through cucoloris (any deliberate shadow pattern projected by a light before it gets to a subject), then all of those shadows will show that warm and cold fringe. The closer the cucoloris is to the strobe, the wider the penumbral fringe will be.

# # #

Thursday, September 10, 2009

Band Photo: Getting a Variety of Looks From One Setup with CTO and Post-Processing Temperature


Cold "homemade slide" look from CTO full gel counter-balanced
with a hard temperature adjustment in post.

by John O'Keefe-Odom
AgXphoto.info

You've got about 15 minutes to get the photo done; they want it for web publicity, and you have no idea what kind of look will go with their music. What kind of plan can you come up with that will present a subject's personality, from personable to vicious, in one setup?

I laid on a full CTO from the left; blasted white from the right, aimed at their black shirts. Roughly half of the photos were also cut with single point lighting; with the CTO at full power on the left.

Sometimes we can overlook the influence of color temperature on monochrome conversions of digital photos. Why use a CTO instead of just plain clamshell lighting? Underpainting.

It's an old trick, used by master painters for hundreds of years. Color temperature can be used to turn the shape of a form. In this case, the forms will wrap from warm to cold, depending on their shape. Warm up one side, or cool down the other, and you can accentuate the tonal changes on round forms in traditional two dimensional illustration.

To vary things further, in post I made changes to the pictures overall color temperature. Meanwhile, the CTO will affect only those surfaces it hit. This means that by choosing what the CTO hits, we can have some forms appear to turn, while others can appear to remain flat.


Normal figure forms on the left to flat, litho-like on the right.

From full form curves on the left to almost flat on the right, while maintaining a flat-appearing background. This frame was single point with full CTO at camera left, from the lighting plan that was already in place.

How strong of an effect that you can achieve with this can be controlled with the intensity of the light striking the subject (subject to flash distance) and the intensity of the coloring of the light. In this case, it's a full CTO.

How we did it. Clamshell lighting plan with
different heights and temperatures on the strobes.

Lighting diagram for the setup. CTO full on camera left, a little high.
White strobe on camera right, aimed for the chest, to help illuminate
the black shirts the subjects wore.

Camera heights and flash heights relative to the subject.


Downward strobe angle and distance of flash to subject can help us move from rounded forms (figure left) to flatter subjects (camera right). Notice, the figure on the right is positioned so that the light striking the side of the face is at a strong, obtuse angle to the camera's lateral axis. Meanwhile, the figure on the left maintains a strobe to subject to camera lateral angle of closer to 90 degrees.

Main post-processing adjustments for temperature.
My runs also include frequent standardized changes in
black point.


Background conditions, by time of day choice,
gave us a very dark, almost black, set of greens
in the background.

A hard, full-on orange from the CTO and white.

Overall exposure set for facial skin tones,
while maintaining drapery in the black fabric.

Colder blue temperature over the camera-recorded
CTO and white. Notice, the post-process changed the
whole image's temperature, but the CTO affected
only those surfaces its light hit.

# # #

Saturday, September 5, 2009

Packed for Flight: Some Air Travel Tips for Photographers

Hard case, as unpacked after flight.

by John O'Keefe-Odom
AgXphoto.info

I remember the look of my hand as I slammed closed the overhead compartment lid. I had just moved the third set of another passenger's luggage for them because they couldn't get their stuff packed into storage by themselves.

I was ticked. This was about the third time in a week that the flight had turned into a comedy of errors for a variety of reasons, all of them centered around passenger luggage.

We've gone from "zoo" to "circus" because of the carry-on baggage thing. Photographers can avoid this. Experienced travelers don't like being part of these problems.

Here's what I learned along the way.

As a photographer, bring the minimum to get the job done. My carry-on baggage fits under the seat. It's light; I check my main cargo. Check most of your photo gear. One laptop, one camera, one lens, all film and digital media are pretty much the only photo items I will carry.

Break down the larger equipment, like tripods, with a screwdriver so that you can get it into ordinary checked baggage.

Do not check film. Carry on film.

Do not check digital memory. Carry on digital memory and laptops.

Pack the main photo gear into a hard case. All of my hard cases have not only the usual scuffs, but some kind of "chew" marks on them from machinery. They take a beating.

Call the airlines after you get your ticket, and find out what the dimensions are for under-seat storage. The websites will have the maximum allowable dimensions for overhead storage.

You will notice other passengers bringing on elephantine luggage that looks like it was stuffed with balloon animals and bowling balls. They'll probably have other items lashed to the outside. Women's purses will be about the size of a Beverly Hills waterbed pillow. They'll contain microwave ovens, or other small kitchen appliances. Don't be one of those guys.

Bring the minimum. Check everything else. Let me say that again: check everything else. Yes, including those lenses; or, whatever else you have with you that you think is important.

If you have an involved trip, you'll need a few weeks, a reliable mail service, and a good receiver for the packages. Consider separate cargo lifts if you have a lot of stuff. The more time you are willing to spend on waiting for the gear, either in advance or after the trip, the cheaper the cargo mailing will be.

Allow for baggage costs in your travel plans. They're frequently removed from the immediate list price. That list price is just a sales pitch. Find out what your actual total would be.

Allow for airline insurance limits in your baggage. If you are not willing to destroy it, then leave it in the studio. My baggage inventories stay at or below 75% of whatever the maximum limit for compensation would be on that bag, for that type of flight.

International flight baggage insurance limits have a tendency to be low. By "low" I mean, below $750; around $500 would be common.

Keep that in mind if you carry a CanNikon 547 X-Mark D 9000 with Hubble Telescope Super Zoom f/1.1 lens.

I avoided an additional $250 in charges on a recent trip by taking a measuring tape to my favorite hard case. It was three inches over size; and, yes, it was heavy. That case has served me well, but it was not the right answer for this last trip. There's no end-all, be-all solution.

Give yourself a shakedown inspection, twice. Do you really need it? If the answer is "maybe", then remove it. Yes, remove it.

I was able to move several hundred dollars in film through carry-on X-ray machines in the United States with no trouble. I chose slower speed films for the trip just for this reason.

100ASA and below will keep you within the X-ray limits by a generous margin. The published limit is 800 ASA. Over that, and the machine is sure to fog the film. Check your TSA website for the requirements before you fly.

Check the specific website of your airlines for baggage and carry-on guidance before you fly. There are so many variations in the rules from airline to airline, and even from aircraft to aircraft (because of spacial structure), that there is no one set of comprehensive rules.

Get the facts about your specific flight, each one, that specific plane, from your airlines.

As an example, here's a list of what I brought on a recent trip, by bag. The trip's project involved using three different formats, digital images, two slide films, and my mainstay, black and white film in 135 and 120mm. Outdoor environments were: desert, grassland, forest, beach and underwater.


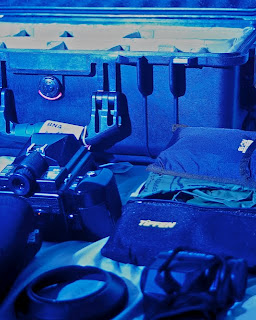
Pelican 1514, packed for flight,
excepting items used to make the picture.


Packed into Pelican Case:

  • Vivitar 285 HV with batteries, 6’ coiled PC cord, hot shoe to PC adapter
  • Changing bag wrapped around Manfrotto Ball/Pan head
  • Pentax 645 80-160mm zoom
  • Pentax 28-80mm FAJ with Zing soft case
  • 77mm lens hood
  • Minolta Spotmeter F
  • Battery recharger with cord
  • DSLR cord
  • 12” PC cord to “thorn”
  • 49mm reversal ring
  • 49mm closeup filter kit
  • 50mm Takumar with K mount adapter
  • Pentax K200D with hot shoe to PC cord adapter and neoprene strap
  • Pentax 645 body
  • Tenba Rain Cover
  • Wet Weather nylon bag
  • 77mm filter kit
  • Scissors, tape, compass


Hard case loading, minus the DSLR that I made the picture with,

its lens, and a tripod head.
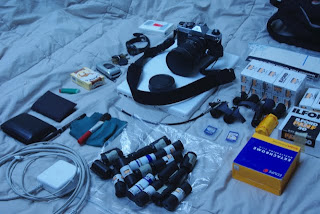


Carry-on contents. Items were well below the size restrictions for

domestic air travel in the USA.


In carry-on:

  • Pentax K1000
  • Pentax 645 Adapter K
  • Pentax 645 35mm lens
  • Cable release
  • Cleaning cloth and brush
  • 120mm films (Ektachrome E100G, Pan F+)
  • 135mm films
  • bulk reel films (EDUPE and Ilford Pan F+)
  • All films at or below 100ASA
  • Laptop computer with cords.
  • Paperwork and personal items I would normally carry in my pockets.


Additional items for photography in different environments

get packed into the suitcase.

In suitcase:

  • Manfrotto tripod, with legs detached by screwdriver
  • Screwdriver
  • Boots
  • EWA Marine UF underwater bag housing
  • Mask, snorkel, fins, 1mm wetsuit
  • Katadyn Pocket Filter water filter
  • Spare 35mm cassettes (empty).
  • Clothing and personal items.

Break down that tripod with a screwdriver
so that you can pack it in a small suitcase.
Pack the screwdriver in checked baggage.

And, if you need me to pack your luggage in an overhead bin because you can't lift it, then remember: I drink Jack Daniel's. Thanks.

Bon Voyage.
J.
# # #